
This is hands-down the best authentic Tres Leches Cake—light as air, soaked in a perfectly sweet milk mixture, and finished with fluffy homemade whipped cream and a dusting of cinnamon. It’s a simple Mexican dessert that never, ever disappoints.
Tres Leches Cake is one of those recipes that everyone in my family agrees on (which is saying something). It’s not overly sweet, it’s surprisingly easy to make, and it’s even better because you can prepare it ahead of time. Soft, moist, and absolutely irresistible—this cake has earned a permanent spot in our list of all-time favorites.
What Is Tres Leches Cake?
Tres leches literally means “three milks.” Tres Leches Cake is a light sponge cake that’s soaked in a sweet mixture made from—you guessed it—three different kinds of milk. It’s a classic dessert in Mexico and throughout Latin America and has become incredibly popular across the United States, especially at Mexican restaurants.
The cake itself is similar to angel food cake. Whipped egg whites are folded into the batter, giving it that signature airy, spongy texture. Once baked, the cake is poked all over with a fork, then drenched in a mixture of evaporated milk, sweetened condensed milk, and whole milk. The cake absorbs every drop, creating a dessert that’s moist without being heavy—exactly how Tres Leches is meant to be.
How to Make Tres Leches Cake:
- In a medium bowl combine flour, baking powder, and salt. Separate the eggs into two other mixing bowls.
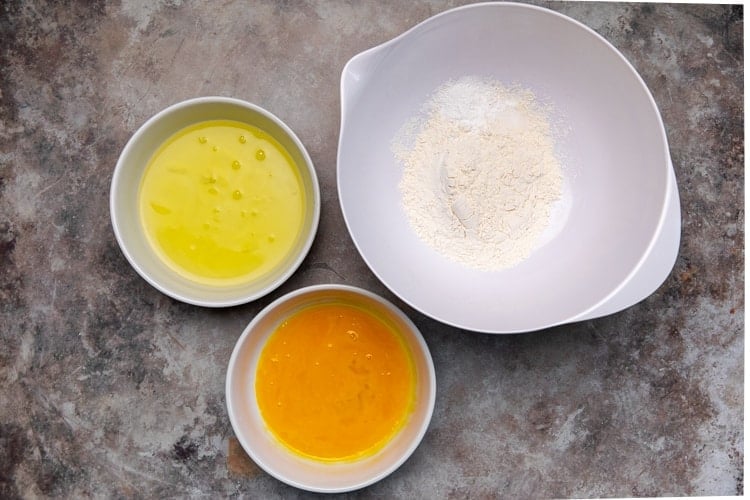
- Add ¾ cup sugar to the bowl with the egg yolks and mix on high speed until yolks are pale yellow. Add ⅓ cup milk and vanilla and stir to combine. Pour the egg yolk mixture over the flour mixture and stir gently just until combined (don't over-mix).
- Use electric beaters to beat the egg whites on high speed. As the begin to whip into stiff peaks, gradually mix in the remaining ¼ cup of sugar. Fold the stiffly beaten egg whites into the batter gently, scraping the bottom and sides of the bowl, until combined.

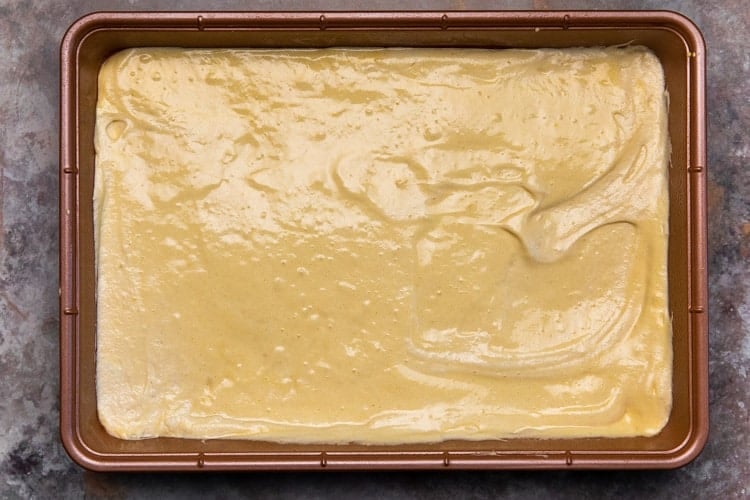
- Pour batter into pan and smooth it into an even layer. Bake for 25 to 35 minutes, or until a toothpick inserted in the center of the cake comes out clean. Remove from the oven and allow cake to cool completely.
- Combine the evaporated milk, sweetened condensed milk, and whole milk in a small bowl. Once the cake has cooled use a fork to poke holes all over the top of the cake.
- Slowly pour the milk mixture over the the top of the cake, making sure to pour near the edges and all around. Refrigerate the cake for at least 1 hour or overnight, to allow it to soak up the milk.

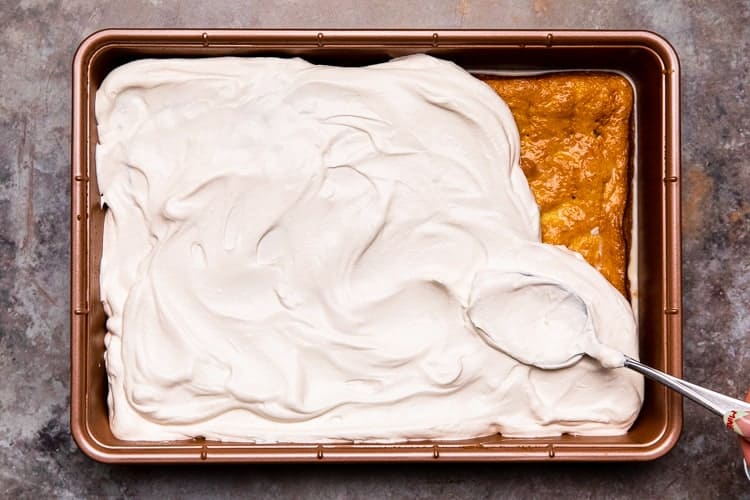
- In the meantime, whip the heavy cream, sugar and vanilla until stiff peaks. Smooth over the top of the cake.
- Serve with a sprinkle of cinnamon on top, and fresh sliced strawberries, if desired. Store Tres Leches Cake in the refrigerator, covered, for 3-5 days.

Make Ahead and Freezing Instructions:
You can make Tres leches cake 1-2 days in advance. In fact, I love to make this cake the night before so that the cake has a lot of time to soak up the milk mixture.
No oil or butter in the cake?
That's right, this Tres Leches Cake is NOT made with butter or oil. The egg whites are the main leavening agent that give it a sponge cake texture, and the three milks poured on top get absorbed by the cake, making it moist without the need of oil or butter.
Tres Leches Cake
The BEST authentic Tres Leches Cake. An ultra light cake soaked in a sweet milk mixture and topped with fresh whipped cream and cinnamon. This simple Mexican dessert is one of our favorites!

Equipment

Ingredients
Cake:
- 1 cup all-purpose flour (120 g)
- 1 1/2 teaspoons baking powder (6 g)
- 1/4 teaspoon salt
- 5 large eggs , separated
- 1 cup granulated sugar , divided (200 g)
- 1/3 cup whole milk (80 ml)
- 1 teaspoon vanilla extract (5 ml)
Milk Mixture:
- 12 ounce can evaporated milk (354 ml)
- 14 ounce can sweetened condensed milk (396 ml)
- 1/4 cup whole milk (60 ml)
Whipped Topping:
- 1 pint heavy whipping cream (475 ml)
- 3 Tablespoons powdered sugar (24 g)
- 1/2 teaspoon vanilla extract (2.5 ml)
- ground cinnamon , for topping
Instructions
- Preheat oven to 350 degrees F.
- In a medium bowl combine flour, baking powder, and salt. Separate the eggs into two other mixing bowls.
- Add ¾ cup sugar to the bowl with the egg yolks and mix on high speed until yolks are pale yellow. Add ⅓ cup milk and vanilla and stir to combine. Pour the egg yolk mixture over the flour mixture and stir gently just until combined (don't over-mix).
- Use electric beaters to beat the egg whites on high speed. As the begin to whip into stiff peaks, gradually mix in the remaining ¼ cup of sugar. Fold the stiffly beaten egg whites into the batter gently, scraping the bottom and sides of the bowl, until combined.
- Pour batter into un-greased pan and smooth it into an even layer. Bake for 25 to 35 minutes, or until a toothpick inserted in the center of the cake comes out clean. Remove from the oven and allow cake to cool completely.
- Combine the evaporated milk, sweetened condensed milk, and whole milk in a small bowl. Once the cake has cooled use a fork to poke holes all over the top of the cake.
- Slowly pour the milk mixture over the the top of the cake, making sure to pour near the edges and all around. Refrigerate the cake for at least 1 hour or overnight, to allow it to soak up the milk.
- In the meantime, whip the heavy cream, sugar and vanilla until stiff peaks. Smooth over the top of the cake. Sprinkle cinnamon on top. Serve with fresh sliced strawberries, if desired. Enjoy!
